Properly adjusting the initial tension of a conveyor belt is a critical step in ensuring system stability, preventing slippage, and minimizing unplanned maintenance costs. However, initial tension is not a "one-size-fits-all" value; it must be calibrated based on the specific tension member material and actual operating conditions. Understanding the core principles and applying the correct tensioning methods will help businesses optimize throughput and extend the service life of their conveyor systems.
What Is Initial Tension?
Initial Tension is the controlled elongation applied to a conveyor belt before operation in order to establish a baseline tension for stable system performance from startup.
Primary Functions
- Ensures sufficient friction between the conveyor belt and the drive pulley
- Stabilizes belt tracking and minimizes belt misalignment
- Distributes stress evenly across the tension member
- Reduces mechanical load on motors, pulleys, and bearings
- Consequences of Incorrect Initial Tension
Consequences of Improper Tensioning:
- Under-tensioning: Causes belt slippage, power loss, and premature wear on the pulley lagging.
- Over-tensioning: Leads to belt tracking errors, edge fraying, and can shorten the belt's lifespan by 20% to 40%.
- Mechanical Strain: Increases the risk of unplanned downtime and bearing failure.
Technical Note:
- Distinguish between Initial Tension (static strain during installation) (ε₀)
- Working Tension (sustained tension during operation)
- Dynamic Tension (fluctuating forces during start/stop or shock loading)
Factors Influencing Initial Tension
Initial tension varies based on several technical variables:
Tension Member Material
- Polyester (EP): Medium elastic modulus, low stretch, and good recovery. Ideal for most standard industrial applications.
- Polyamide (Nylon/NN): Higher elasticity than Polyester; prone to "creep" (permanent stretch). Usually requires higher initial tension.
- Aramid (Kevlar): Extremely high modulus with nearly zero creep. Perfect for heavy-duty, long-distance, or high-precision lines.
- Steel Cord: Highest stiffness. Tension must be set strictly according to the manufacturer’s technical data sheet.
Conveyor Length
For systems exceeding 20 meters, cumulative measurement errors increase. Precision tools and longer measurement marks are required to ensure accuracy.
Load Conditions
Heavy or "shock" loads (abrupt material impact) require higher tension settings to prevent slippage at the drive pulley.
Ambient Temperature
Environments exceeding 60°C cause materials like PVC, PU, and Polyamide to soften and stretch. Recalibration is mandatory after the first few heat cycles.
Recommended Initial Tension by Material
| Tension Member Material | Minimum Initial Tension (ε₀ min) | Maximum Initial Tension (ε₀ max) |
|---|---|---|
| Polyester Fabric | 0.3% | ~1.0% |
| Polyamide Fabric | 0.5% | ~1.5% |
| Aramid (Kevlar) | 0.2% | 0.6% |
| Steel Cord | According to manufacturer catalogue | According to manufacturer catalogue |
Technical Notes
- The values above are reference values only and should always be verified against the manufacturer’s catalogue
- Heavy-duty or shock-load systems should use tension values near the upper end of the recommended range
- High-precision conveyor systems should prioritize lower tension values to minimize material deformation
Marking Method for Initial Conveyor Belt Tension Adjustment
Principle of the Marking Method
The marking method is a direct way to measure conveyor belt elongation by observing the change in distance between two reference marks before and after tension adjustment.
As the take-up mechanism stretches the conveyor belt, the distance between the two marked points increases. Correct tension adjustment is achieved when this distance reaches the calculated target value.
Elongation Formula: L₁ = L₀ + (L₀ × ε₀)
Where:
- (L₀): Original distance when the belt is in a relaxed state
- (L₁): Distance after tension adjustment
Standard Marking Distances
- 1000 mm: Standard for most conveyor systems
- 500 mm: Short conveyors (<3 m)
- 400 mm: Mini conveyor systems (<1 m)
The general rule is: the longer the measurement span, the lower the relative measurement error and the higher the accuracy.
Initial Conveyor Belt Tension Adjustment Procedure
To apply the marking method correctly, follow the steps below:
Step 1: Bring the Conveyor to a Resting State
Before measurement, remove all conveyed materials and release the take-up mechanism so the conveyor returns to a no-load condition. Verify that no residual tension remains from previous operation.
For newly installed or newly spliced belts, allow the belt to stabilize naturally for approximately 15 minutes before adjustment to improve accuracy.
Step 2: Mark Two Reference Points
Use a marker pen to draw two lines perpendicular to the belt running direction. The standard distance between the marks is usually (L_0 = 1000\text{ mm}) for easier calculation.
It is recommended to mark both belt edges to verify whether tension is distributed evenly during adjustment.
Step 3: Apply Preliminary Tension
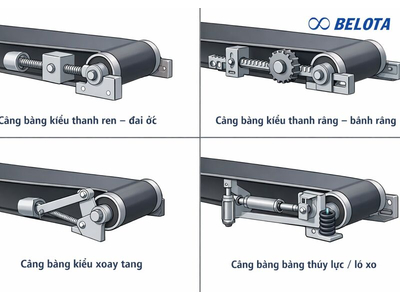
Increase the belt tension using the tensioning screw or take-up mechanism. Both sides should be adjusted evenly in small increments while checking measurements after each adjustment.
The adjustment process continues until the distance between the two marks reaches the target value based on the design specification.
Examples
- If the required initial tension is (ε₀ = 0,5%), the original 1000 mm distance should increase to 1005 mm
- If (ε₀ = 0,3%), the distance after adjustment should reach 1003 mm
Tension should be increased gradually and monitored continuously to avoid over-tensioning.
Step 4: Perform a No-Load Test Run
After preliminary adjustment, operate the conveyor without load for at least one complete cycle. This allows the tension to distribute evenly across the entire belt circumference and helps stabilize the system before actual production.
Step 5: Final Inspection and Fine Adjustment
Stop the conveyor and remeasure the distance between the reference marks. If the deviation exceeds ±0.5 mm from the target value, repeat the adjustment process starting from Step 3.
Common Mistakes During Initial Tension Adjustment
Adjusting Tension by Feel
One of the most common mistakes is relying on visual estimation or hand checking instead of using actual measurements. This often results in uneven or excessive belt tension.
Tensioning Only One Side
Many technicians adjust only one side of the take-up system for convenience, but this is a common cause of belt mistracking. Uneven tension causes the belt to drift toward the tighter side, leading to edge wear and frame contact.
Over time, this also affects pulleys, rollers, and overall system stability.
Skipping the Test Run
Skipping the no-load test run may leave uneven tension distribution undetected. Some materials, especially Polyamide (Nylon), can change elongation characteristics after the first operating cycle.
Ignoring Manufacturer Specifications
Manufacturers such as Habasit, Forbo, and Ammeraal Beltech provide different initial tension specifications for each belt type. Applying a single universal tension value is not considered proper engineering practice.
Inspection and Maintenance After Installation
After initial tension adjustment, periodic inspection is necessary to maintain stable conveyor operation.
Recommended Inspection Intervals
- After the first 24 hours of operation
- After approximately one week of operation
- Every 3–6 months depending on operating conditions
- After replacing pulleys, motors, or when mechanical transmission issues occur
Technical Recommendations
- Always refer to the manufacturer’s catalogue for specific tension values
- Maintain installation records including belt model, installation date, actual tension values, and ambient temperature
- Train maintenance technicians to standardize procedures and reduce field adjustment errors
Frequently Asked Questions
Why is a no-load test run necessary after adjustment?
A no-load test allows belt tension to distribute evenly across the entire belt length and circumference. This is especially important for high-elasticity materials such as Polyamide.
Does uneven adjustment immediately cause problems?
The issue may not appear immediately, but uneven tension creates asymmetric loading forces that gradually cause belt tracking errors and edge wear. Belota recommends checking symmetry on both belt edges throughout the adjustment process to ensure centered belt tracking.
What should be considered in high-temperature environments?
In environments above 60°C, conveyor materials - especially PVC and PU belts - naturally expand due to heat. Belota’s technical specialists recommend rechecking belt tension after the first operating cycle to compensate for thermal elongation. Without readjustment, the belt may loosen and begin slipping on the drive pulley.
Conclusion
Initial conveyor belt tension adjustment is not only essential for stable conveyor performance but also plays a major role in determining the service life of the entire conveyor system. To select the correct conveyor belt and establish accurate technical settings, contact Belota for technical consultation and fast quotation support from our engineering team.